Getting Started with ScyllaDB Cloud Using Node.js Part 1
This article is the first of a series that walks you through how to get started building a backend application with ScyllaDB. Read part 2: Getting Started with ScyllaDB Cloud Using Node.js Part 2: CRUD operations.
In this article, we will review the basics of ScyllaDB, then create and deploy a cluster on AWS using Scylla Cloud.
What’s a CRUD App?
CRUD stands for Create, Read, Update and Delete. In this article, we will build a simple application that will connect to our database and do just that using NodeJS and Scylla Cloud.
Why Should You Care?
JavaScript is and has been the most popular programming language for the past decade. With the evolution of JavaScript compilers, frameworks, and languages such as typescript, NodeJS has become one of the most popular choices to build backend applications and REST APIs. ScyllaDB on the other hand is one of the hottest NoSQL databases in the market today because of its lightspeed performance.
Whether you’re a junior or an experienced developer, this article will help you understand the building blocks and NodeJS application and how to connect it a ScyllaDB cluster running in the cloud.
Getting Started
To start, we will first open the terminal and run the following command to clone the project starter repository:
git clone https://github.com/raoufchebri/getting-started.git
Let’s then change directory:
cd getting-started/nodejs/starterThe project is split into two applications: client and server.
Client
The client application is a simple ReactJS Todo application that allows users to add, mark as complete, and remove tasks.
To run the application, move to the client directory and run the following commands:
npm install
npm start
It’s available, the application will run on http://localhost:3000.
The client application is not connected to any server. If you refresh your browser, you will notice all the tasks that you added disappear. In this article, we will create and connect our client app to the server and store the data in Scylla Cloud.
Server
Let’s now move to the server directory and create implement the CRUD functions.
The application is structured as follow:
– src
—- api
—--- index.js
—--- items.js
—- index.js
– .env
– package.json
The package.json file lists all of the project dependencies:
"dependencies": {
    "cassandra-driver": "^4.6.3",
    "cors": "^2.8.5",
    "dotenv": "^16.0.0",
    "express": "^4.17.2",
    "nodemon": "^2.0.15"
}
In the server directory, let’s install all project dependencies by running the following command:
npm installWe will then start the application by running:
npm run devBy default, the application will run on http://localhost:3001. If for any reason you would like to change the port, you can do so by updating the .env file and re-run the application.
Open http://localhost:3001 on your browser, and you should see the following message:
{
     "message": "Welcome to Scylla 😉"
}
http://localhost:3001/api should return the following object:
{
    "message": "Welcome to API 🚀"
    }
Let’s now move to /api/items.js file explore the code:
const express = require('express');
const router = express.Router();

// Create one item
router.post('/', async (req, res, next) => {
    try {
        res.json({ message: 'Create one item' });
    } catch (err) {
        next(err);
    }
});

// Get all items
router.get('/', async (_, res, next) => {
    try {
        res.json({ message: 'Get all item' });
    } catch (err) {
        next(err);
    }
});

// Delete one item
router.delete('/:id', async (req, res, next) => {
   try {
      const { id } = req.params;
      res.json({ message: `Delete one item ${id}` });
   } catch (err) {
      next(err);
   }
});

// Update one item
router.put('/:id', async (req, res, next) => {
   try {
      const { id } = req.params;
      res.json({ message: `Update one item ${id}` });
   } catch (err) {
      next(err);
   }
});

module.exports = router;
In items.js, we have defined the post, get, put and delete middlewares with their respective callback functions.
We can test the API by sending a GET request through the following command:
curl -v http://localhost:3001/api/items
You should expect the following result:
*   Trying ::1:3001...
* Connected to localhost (::1) port 3001 (#0)
> GET /api/items HTTP/1.1
> Host: localhost:3001
> User-Agent: curl/7.77.0
> Accept: */*
>
* Mark bundle as not supporting multiuse
< HTTP/1.1 200 OK
< X-Powered-By: Express
< Access-Control-Allow-Origin: *
< Content-Type: application/json; charset=utf-8
< Content-Length: 26
< ETag: W/"1a-wtLtpakh/aHZijHym0cXyb81o1k"
< Date: Mon, 14 Feb 2022 10:22:12 GMT
< Connection: keep-alive
< Keep-Alive: timeout=5
<
* Connection #0 to host localhost left intact
{"message":"Get all item"}
The GET request runs the callback function implemented the router.get middleware in items.js.
Create a ScyllaDB Cloud Cluster
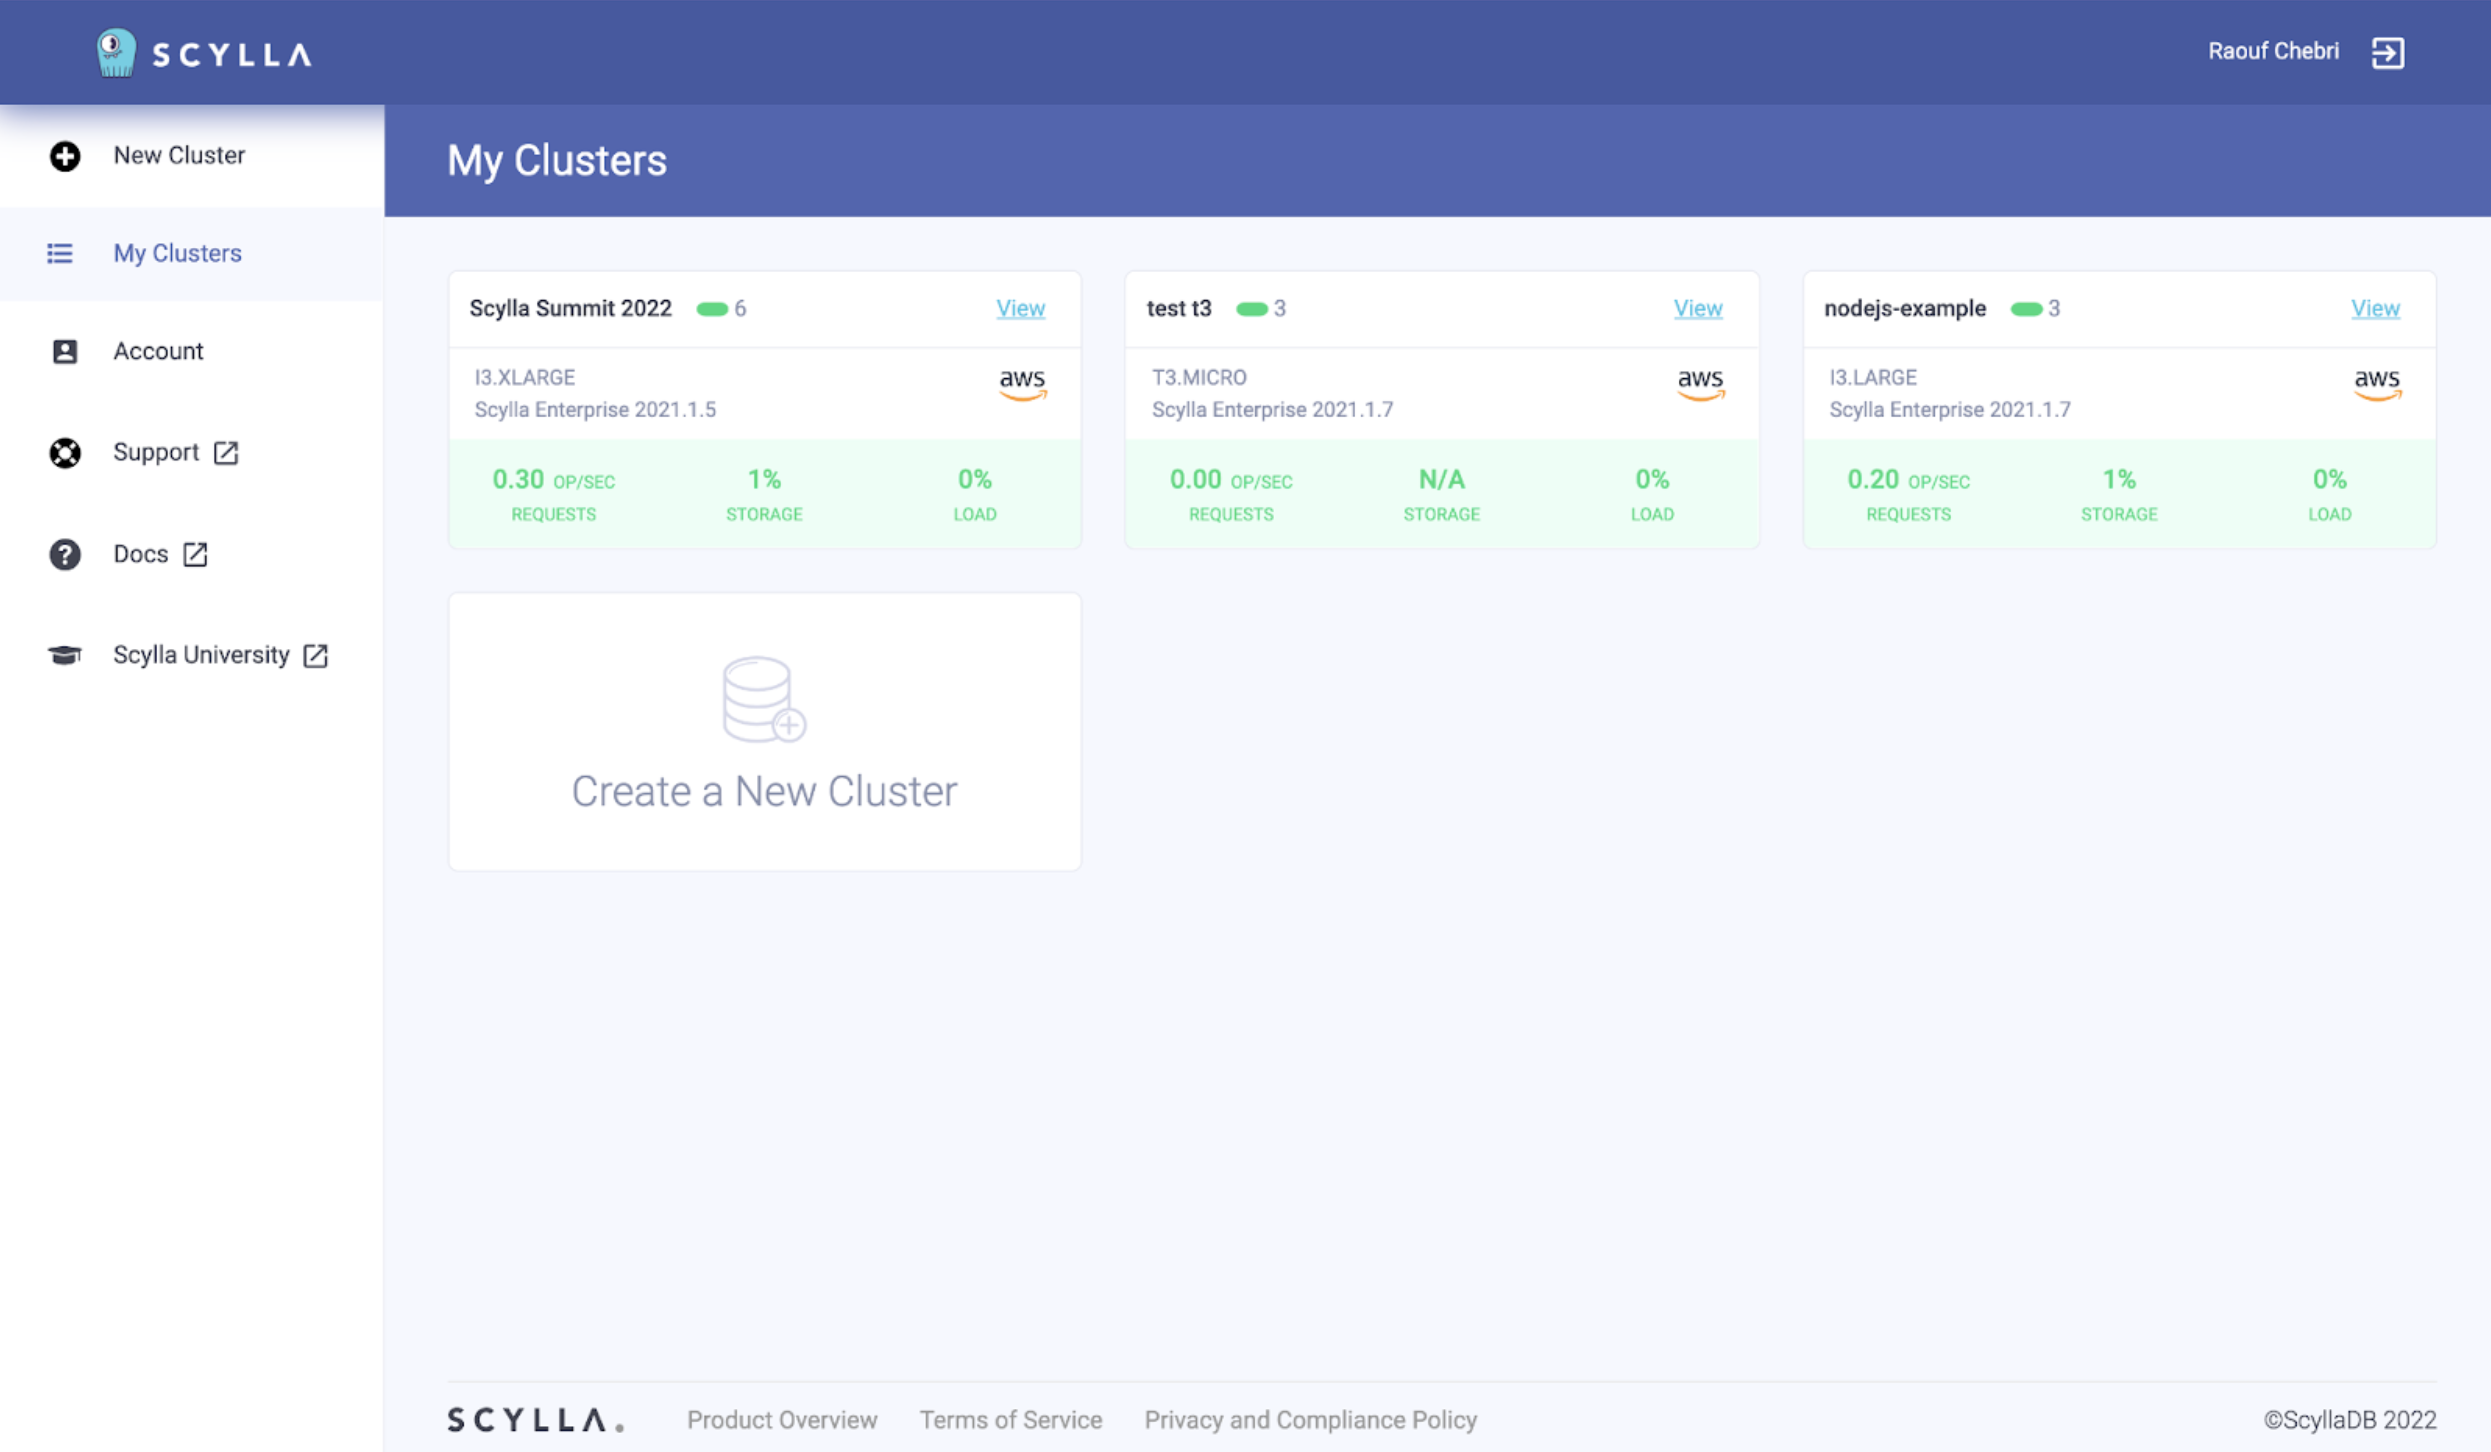
The next step is to create an account on https://cloud.scylladb.com. You can use the free trial account to follow along. The home page shows the running clusters. You will probably have an empty page if you are new to Scylla Cloud. Let’s go ahead and create a new cluster by clicking on the “Create a New Cluster” card.
On the new cluster page, enter the name of your cluster. I will name mine “my scylla cluster”. I will also leave the provider to AWS and use the Scylla Account to deploy the cluster.
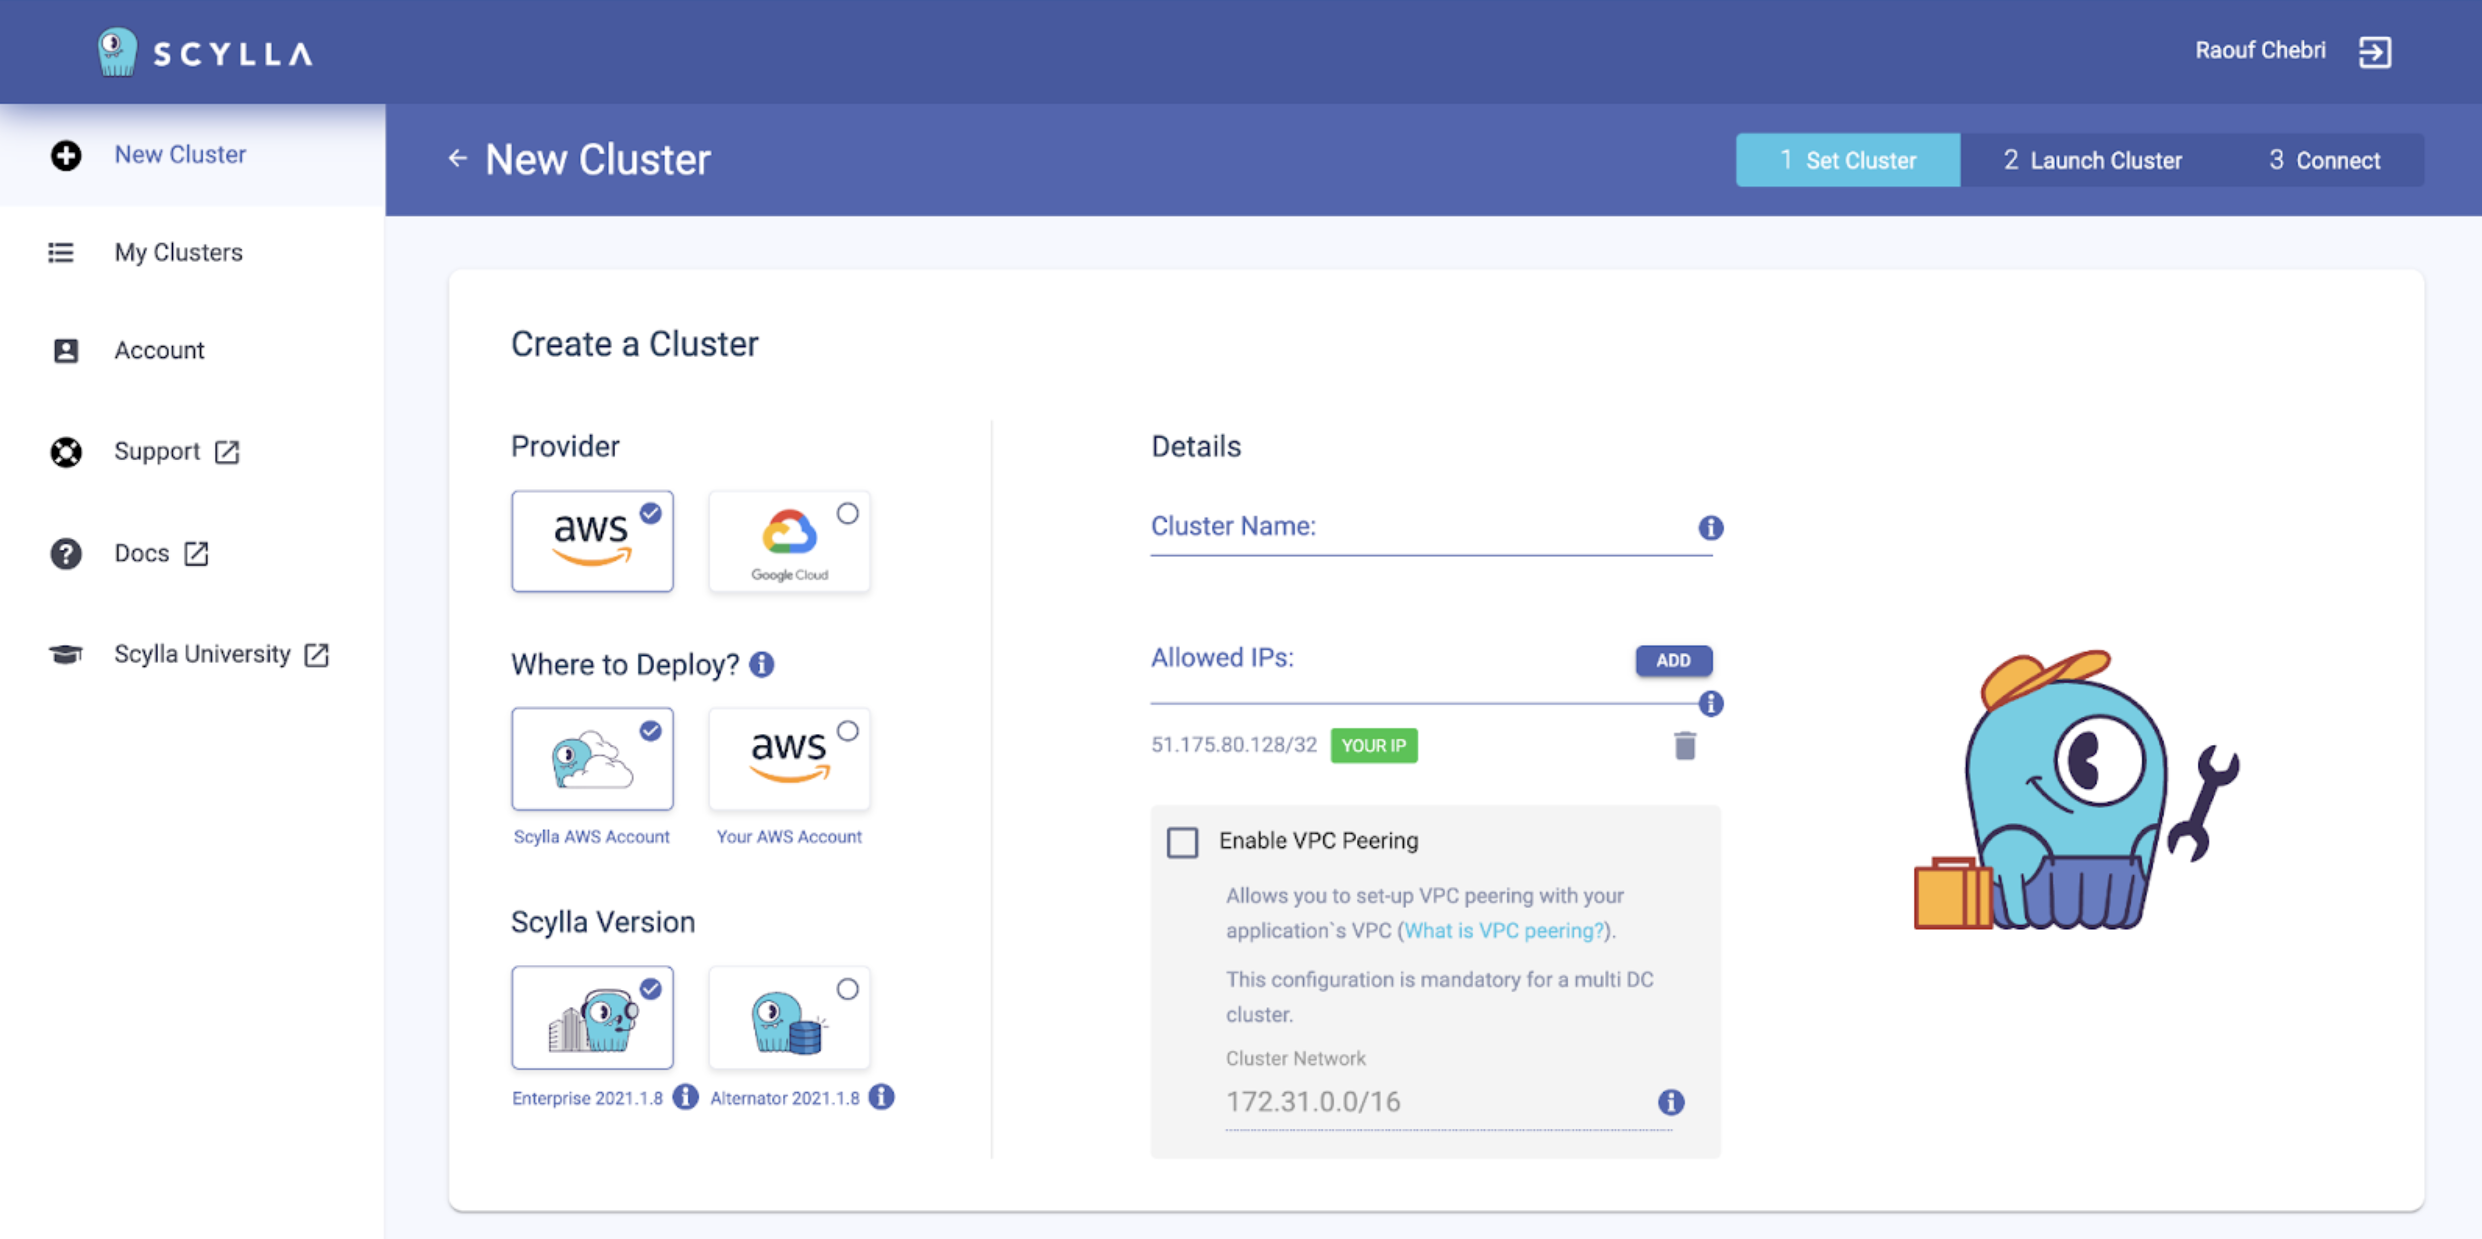
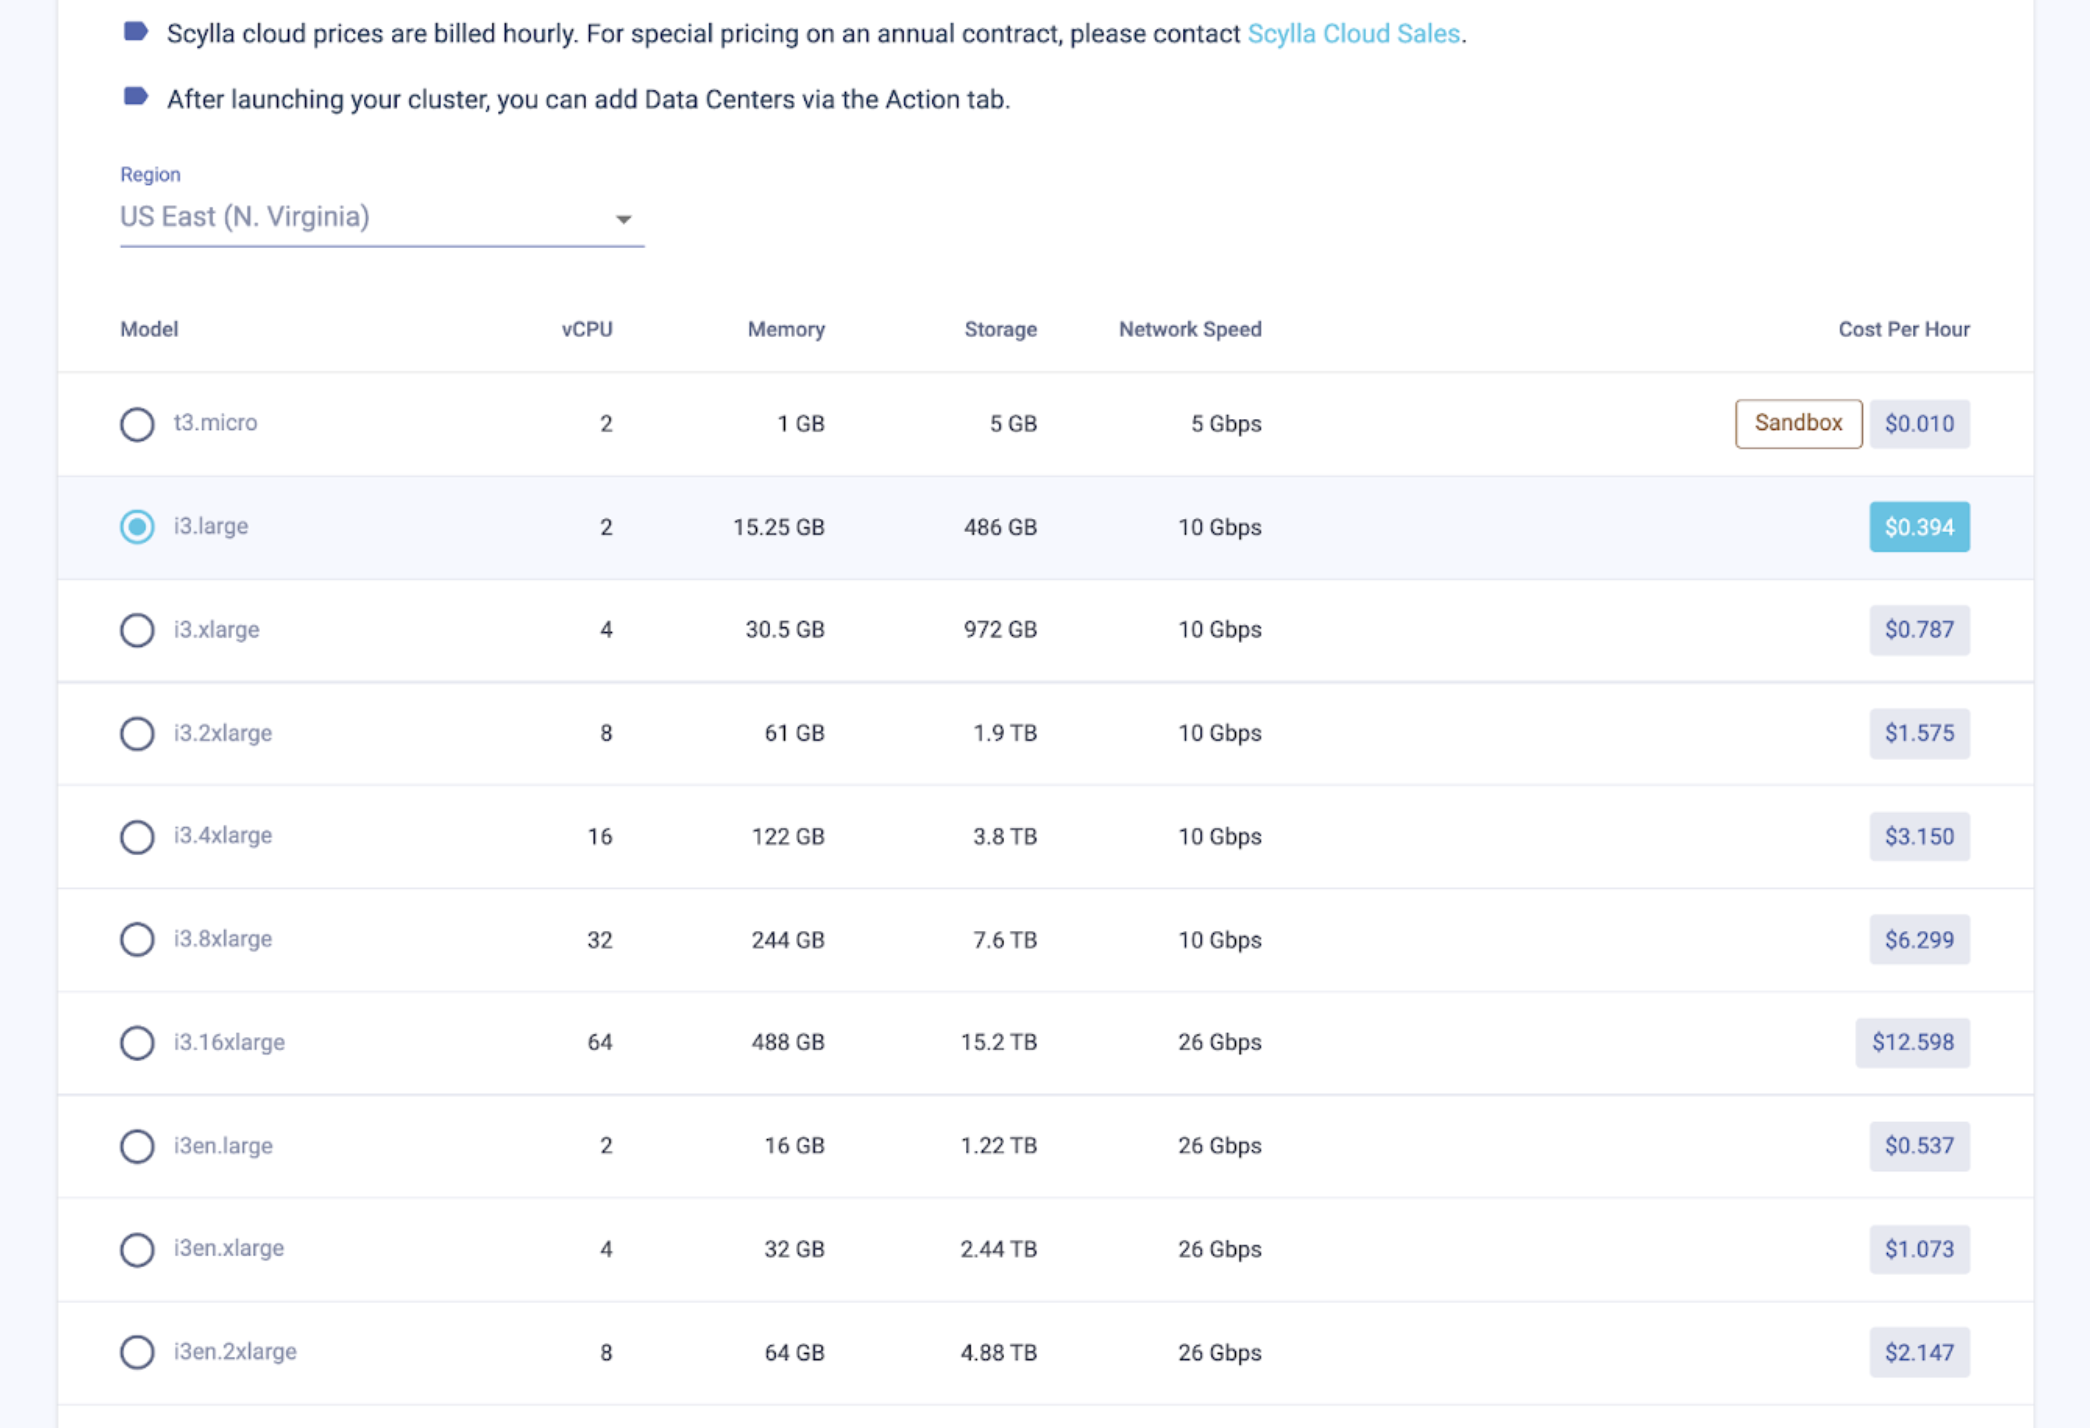
If you scroll down a little bit, you will see the list of machines available to you. If you are using a free trial account, you will likely use a t3.micro, which is plenty for our example here. If you want to explore other machines, be aware of the cost per node when you create your cluster. To deploy your app on Scylla Cloud, you can use the tools on https://price-calc.gh.scylladb.com/ to have an estimate of the cost associated with a cluster.
Let’s scroll to the bottom of the page and create the cluster. You might take this opportunity to have a small break and get a cup of coffee, as this process usually takes a few minutes.

Great! You’re back energized and ready to explore. First, click on the connect button or go to the connect tab on your cluster’s main page. You will notice the IP addresses of your nodes along with your credentials. That information is critical to access your database and should not be made public or accessible in your app. We will use the dotenv library and a .env file to hide our credentials later on.
Create a Keyspace and Table using CQLSH
Let’s now test it out. Click on the “Cqlsh” item on the left side menu and follow the instructions to connect to your cluster.
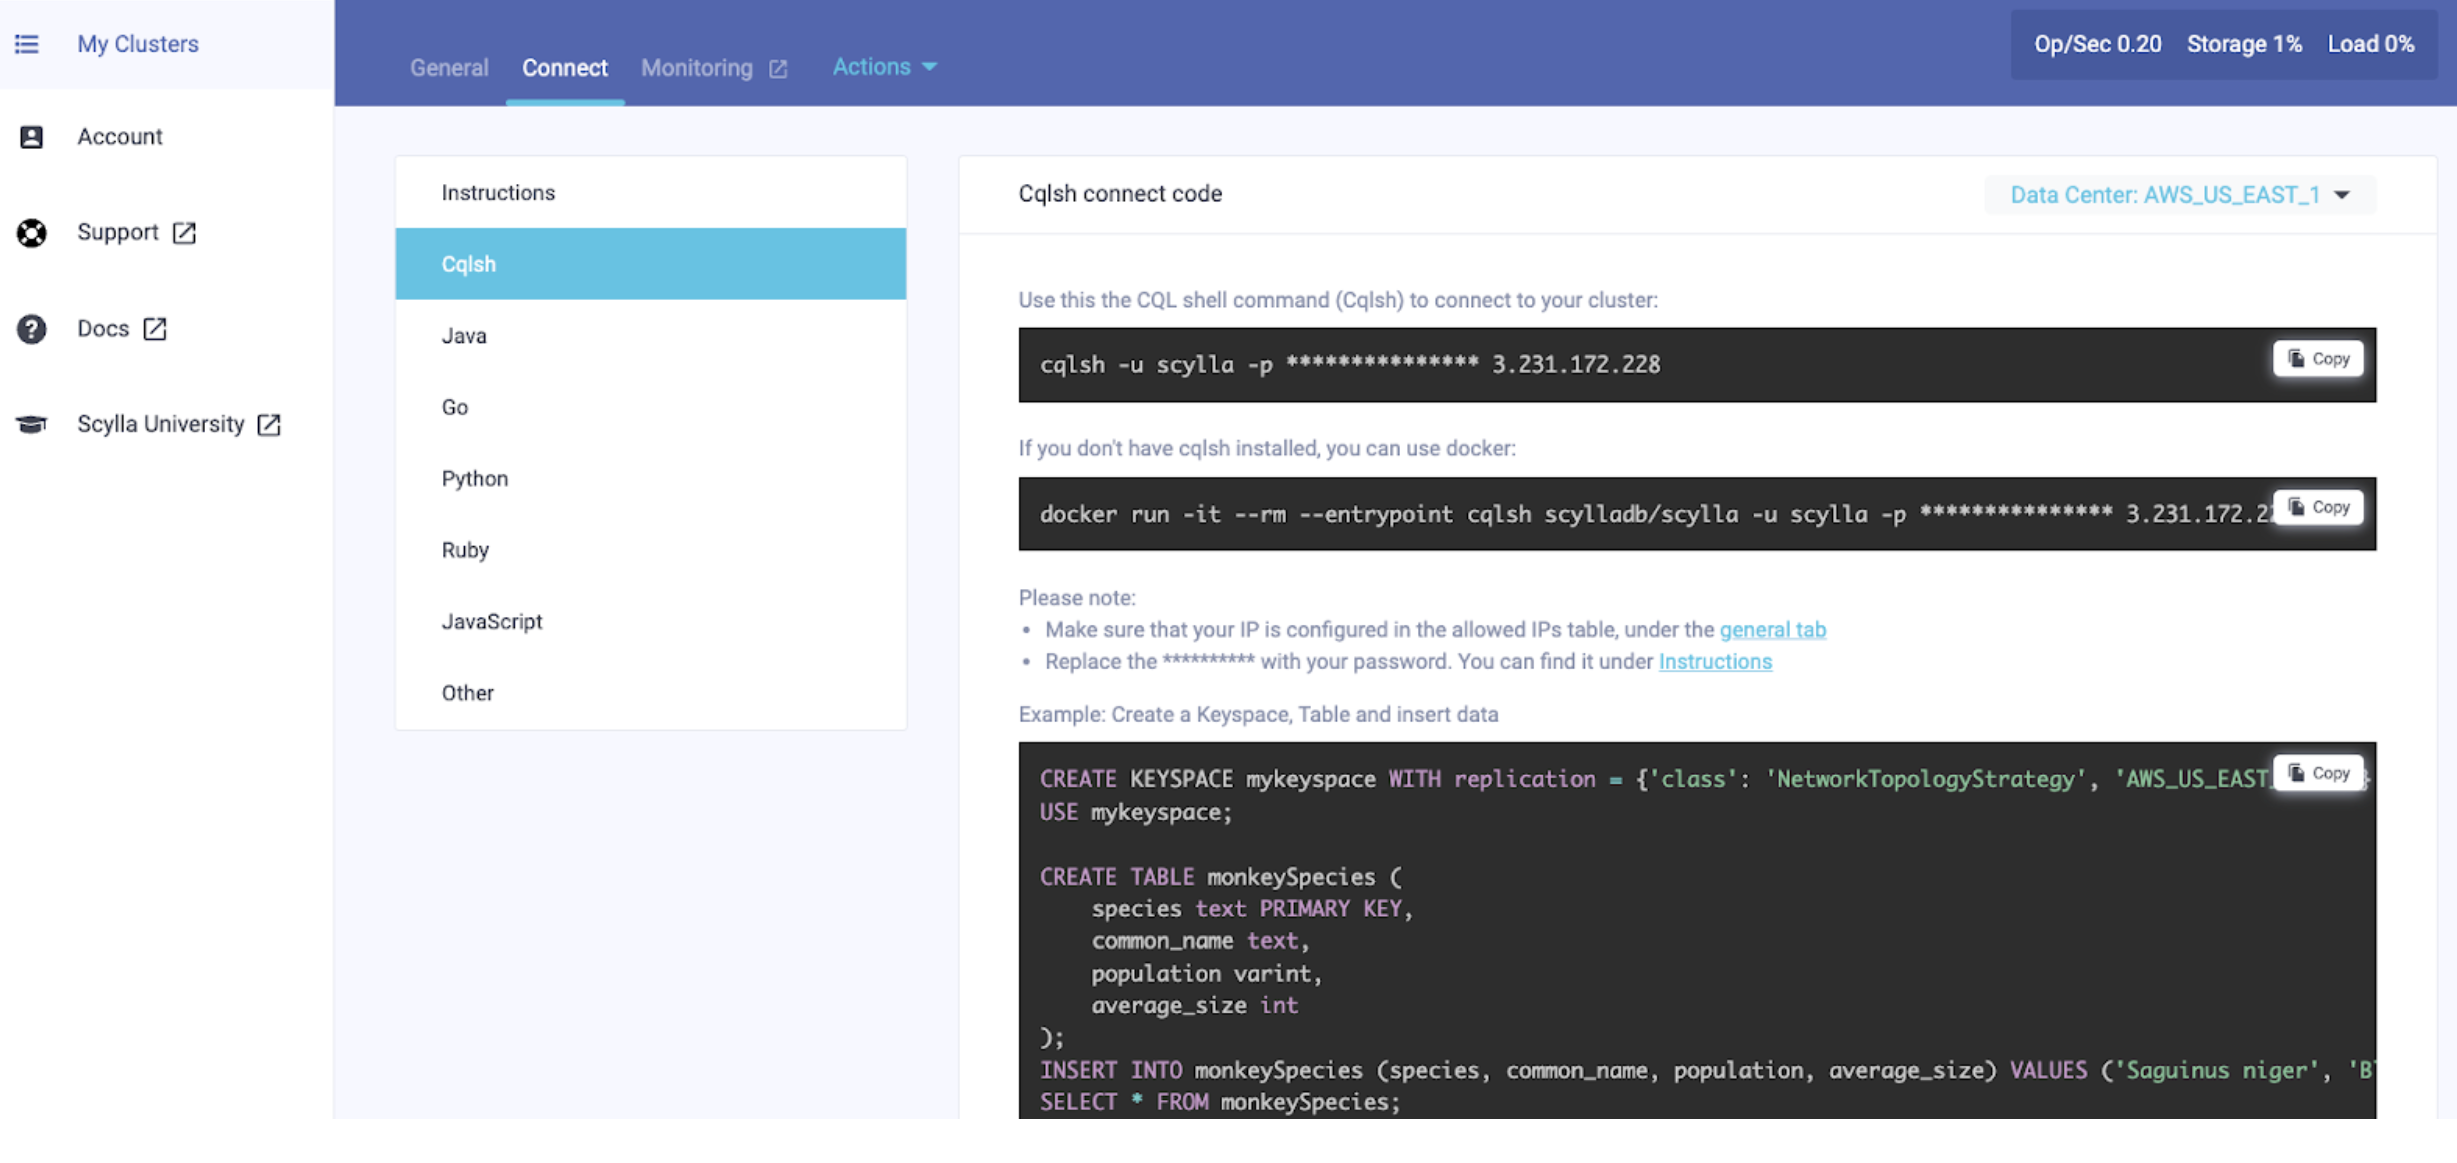 I will use docker since I do not have cqlsh installed on my machine.
docker run -it --rm --entrypoint cqlsh scylladb/scylla -u [USERNAME] -p [PASSWORD] [NODE_IP_ADDRESS]Note that you will need to replace the USERNAME, PASSWORD, and NODE_IP_ADDRESS with your own.
The above command instructs docker to create a new container with the scylladb/scylla image and run cqlsh, which is short for the Cassandra Query Language Shell. You will then be at the shell prompt.
Let’s create a new keyspace. A keyspace is a location where the data is stored. I’m using the code provided in the connect tab under Cqlsh.
CREATE KEYSPACE todos WITH replication = {'class': 'NetworkTopologyStrategy', 'AWS_US_EAST_1' : 3} AND durable_writes = true;Let’s then use the newly created keyspace.
USE todos;Then create table items. Note that in ScyllaDB, it is mandatory to have a PRIMARY KEY. More about that on Scylla University in this lesson.
CREATE TABLE items ( id uuid PRIMARY KEY, name text, completed boolean);Let’s now insert some values.
INSERT INTO items (id, name, completed) VALUES (uuid(), 'my first task',false);And run a SELECT query to make sure we correctly saved the data.
SELECT * FROM items;`

 id                                   | completed | name
--------------------------------------+-----------+---------------
 0536170a-c677-4f11-879f-3a246e9b032d |     False | my first task
Connect the Server App to Scylla Cloud
In the server directory, locate and open the .env file, and provide the cluster information that you can find on Scylla Cloud:
USERNAME=""
PASSWORD=""
DATA_CENTER=""
NODE_IP=""
KEYSPACE="todos"
The reason we’re using environment variables is to hide sensitive information that you might pass to the client.
In items.js file, Let’s import the cassandra-driver and the dotenv config like so:
const cassandra = require('cassandra-driver');
require('dotenv').config();
The reason we’re using the cassandra-driver package is that it is fully compatible with ScyllaDB, which is convenient to migrate from Apache Cassandra to Scylla.
We will also add our environment variables to the items.js file and create an instance of Client using the following code:
const { NODE_IP, DATA_CENTER, USERNAME, PASSWORD, ITEMS_KEYSPACE } =
   process.env;

const cluster = new cassandra.Client({
   contactPoints: [NODE_IP],
   localDataCenter: DATA_CENTER,
   credentials: { username: USERNAME, password: PASSWORD },
   keyspace: KEYSPACE,
});
Et voilà!
Congratulations! You’ve created your first ScyllaDB cluster on the cloud.
In this article, we cloned the todo-app project and installed its dependencies. We looked at both the client and server structure and tested the frontend and the API. We also create a cluster using Scylla Cloud, and connected it to NodeJS using the cassandra-driver and cqlsh. In the next article, we see how to implement the CRUD operations.
Read part 2: Getting Started with ScyllaDB Cloud Using Node.js Part 2: CRUD operations.