CarePet: An Example IoT Use Case with ScyllaDB and Go
We recently published CarePet, a project that demonstrates a generic Internet of Things (IoT) use case for ScyllaDB. The application is written in Go and allows tracking of pets’ health indicators. It consists of three parts:
- a collar that reads and pushes sensors data
- a web app for reading and analyzing the pets’ data
- a database migration tool
In this post, we’ll cover the main points of the guide. Check out the Github repo with the full code. The complete guides are here.
Keep in mind that this example is not fully optimized and is not production ready and should be used for reference purposes only.
Introduction
In this guided exercise, you’ll create an IoT app from scratch and configure it to use Scylla as the backend datastore. We’ll use as an example, an application called CarePet, which collects and analyzes data from sensors attached to a pet’s collar and monitors the pet’s health and activity. The example can be used, with minimal changes, for any IoT-like application. We’ll go over the different stages of the development, from gathering requirements, creating the data model, cluster sizing and hardware needed to match the requirements, and finally, building and running the application.
Use Case Requirements
Each pet collar includes sensors that report four different measurements: Temperature, Pulse, Location, and Respiration. The collar reads the sensors data once a minute, aggregates it in a buffer and sends measurements directly to the app once an hour. The application should scale to 10 Million pets. It keeps the data history of a pet for a month. Thus the database will need to scale to contain 43 billion data points in a month (60 × 24 × 30 × 10,000,000 = 43,200,000,000); 43,200 data samples per pet. If the data variance is low, it will be possible to further compact the data and reduce the number of data points.
Note that in a real world design you’d have a fan-out architecture, with the end-node IoT devices (the collars) communicating wirelessly to an MQTT gateway or equivalent, which would, in turn, send updates to the application via, say, Apache Kafka. We’ll leave out those extra layers of complexity for now, but if you are interested check out our post on Scylla and Confluent Integration for IoT Deployments.
Performance Requirements
The application has two parts:
- Sensors: writes to the database, throughput sensitive
- Backend dashboard: reads from the database, latency-sensitive
For this example, we assume 99% writes (sensors) and 1% reads (backend dashboard)
Desired Service Level Objectives (SLOs):
- Writes throughput of 670K Operations per second
- Reads: latency of up to 10 milliseconds per key for the 99th percentile.
The application requires high availability and fault tolerance. Even if a Scylla node goes down or becomes unavailable, the cluster is expected to remain available and continue to provide service. You can learn more about Scylla high availability in this lesson.
Design and Data Model
In this part we’ll think about our queries, make the primary key and clustering key selection, and create the database schema. See more in the data model design document.
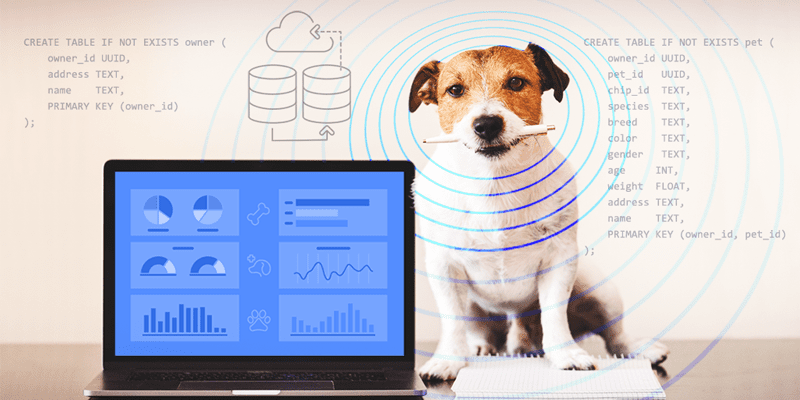
Here’s how we will create our data using CQL:
CREATE TABLE IF NOT EXISTS owner (
    owner_id  UUID,
    address   TEXT,
    name      TEXT,
    PRIMARY KEY (owner_id)
);

CREATE TABLE IF NOT EXISTS pet (
    owner_id  UUID,
    pet_id    UUID,
    chip_id   TEXT,
    species   TEXT,
    breed     TEXT,
    color     TEXT,
    gender    TEXT,
    age       INT,
    weight    FLOAT,
    address   TEXT,
    name      TEXT,
    PRIMARY KEY (owner_id, pet_id)
);

CREATE TABLE IF NOT EXISTS sensor (
    pet_id    UUID,
    sensor_id UUID,
    type      TEXT,
    PRIMARY KEY (pet_id, sensor_id)
);

CREATE TABLE IF NOT EXISTS measurement (
    sensor_id UUID,
    ts        TIMESTAMP,
    value     FLOAT,
    PRIMARY KEY (sensor_id, ts)
) WITH compaction = { 'class' : 'TimeWindowCompactionStrategy' };

CREATE TABLE IF NOT EXISTS sensor_avg (
    sensor_id UUID,
    date      DATE,
    hour      INT,
    value     FLOAT,
    PRIMARY KEY (sensor_id, date, hour)
) WITH compaction = { 'class' : 'TimeWindowCompactionStrategy' };
Deploying the App
Prerequisites:
- go, version 1.14 or newer
- docker
- docker-compose
The example application uses Docker to run a three-node ScyllaDB cluster. It allows tracking of pet’s health indicators and consists of three parts:
- migrate (/cmd/migrate) – creates the CarePet keyspace and tables
- collar (/cmd/sensor) – generates a pet health data and pushes it into the storage
- web app (/cmd/server) – REST API service for tracking the pets’ health state
Download the example code from git:
$ git clone git@github.com:scylladb/care-pet.git
Start by creating a local Scylla cluster consisting of 3 nodes:
$ docker-compose up -d
Docker-compose will spin up a Scylla cluster consisting of 3 nodes: carepet-scylla1, carepet-scylla2 and carepet-scylla3. Wait for about two minutes and check the status of the cluster: To check the status of the cluster:
$ docker exec -it carepet-scylla1 nodetool status
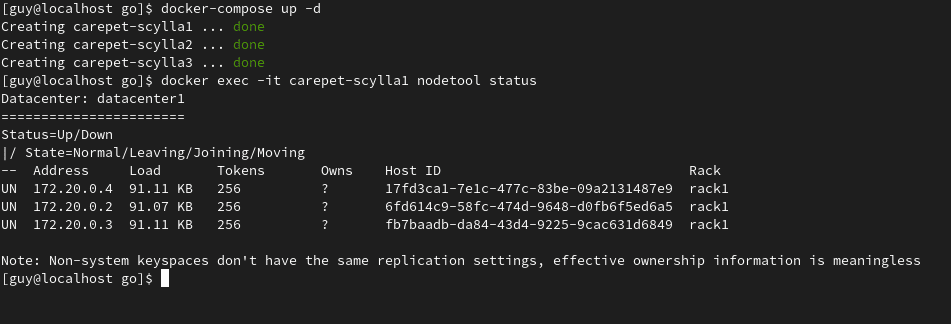
Once all the nodes are in UN – Up Normal status, initialize the database. This will create the keyspaces and tables:
$ go build ./cmd/migrate

$ NODE1=$(docker inspect -f '{{range .NetworkSettings.Networks}}{{.IPAddress}}{{end}}' carepet-scylla1)

$ ./migrate --hosts $NODE1
Which will produce this format of expected output:
2020/08/06 16:43:01 Bootstrap database...
2020/08/06 16:43:13 Keyspace metadata = {Name:carepet DurableWrites:true StrategyClass:org.apache.cassandra.locator.NetworkTopologyStrategy StrategyOptions:map[datacenter1:3] Tables:map[gocqlx_migrate:0xc00016ca80 measurement:0xc00016cbb0 owner:0xc00016cce0 pet:0xc00016ce10 sensor:0xc00016cf40 sensor_avg:0xc00016d070] Functions:map[] Aggregates:map[] Types:map[] Indexes:map[] Views:map[]}
Next, start the pet collar simulation. From a separate terminal execute the following command to generate the pet’s health data and save it to the database:
$ go build ./cmd/sensor

$ NODE1=$(docker inspect -f '{{range .NetworkSettings.Networks}}{{.IPAddress}}{{end}}' carepet-scylla1)

$ ./sensor --hosts $NODE1
Which will produce this format of expected output:
2020/08/06 16:44:33 Welcome to the Pet collar simulator
2020/08/06 16:44:33 New owner # 9b20764b-f947-45bb-a020-bf6d02cc2224
2020/08/06 16:44:33 New pet # f3a836c7-ec64-44c3-b66f-0abe9ad2befd
2020/08/06 16:44:33 sensor # 48212af8-afff-43ea-9240-c0e5458d82c1 type L new measure 51.360596 ts 2020-08-06T16:44:33+02:00
2020/08/06 16:44:33 sensor # 2ff06ffb-ecad-4c55-be78-0a3d413231d9 type R new measure 36 ts 2020-08-06T16:44:33+02:00|2020/08/06 16:44:33 sensor # 821588e0-840d-48c6-b9c9-7d1045e0f38c type L new measure 26.380281 ts 2020-08-06T16:44:33+02:00
...
Make a note of the pet’s Owner ID (the ID is the part after the # sign without trailing spaces). We will use it later.
Now, start the REST API service in a separate, third, terminal. This server exposes a REST API that allows for tracking the pets’ health state:
$ go build ./cmd/server
$ NODE1=$(docker inspect -f '{{range .NetworkSettings.Networks}}{{.IPAddress}}{{end}}' carepet-scylla1)

$ ./server --port 8000 --hosts $NODE1
Producing this expected output:
2020/08/06 16:45:58 Serving care pet at http://127.0.0.1:8000
Using the Application
Open http://127.0.0.1:8000/ in a browser or send an HTTP request from the CLI:
$ curl -v http://127.0.0.1:8000/
Produces this expected output:
GET / HTTP/1.1
> Host: 127.0.0.1:8000
> User-Agent: curl/7.71.1
> Accept: */*
>
* Mark bundle as not supporting multiuse
< HTTP/1.1 404 Not Found
< Content-Type: application/json
< Date: Thu, 06 Aug 2020 14:47:41 GMT
< Content-Length: 45
< Connection: close
<
* Closing connection 0
{"code":404,"message":"path / was not found"}
If you see this JSON in the end with 404, it means everything works as expected. To read an owner’s data use the previously saved owner_id as follows:
$ curl -v http://127.0.0.1:8000/api/owner/{owner_id}
for example:
$ curl http://127.0.0.1:8000/api/owner/a05fd0df-0f97-4eec-a211-cad28a6e5360
expected result:
{"address":"home","name":"gmwjgsap","owner_id":"a05fd0df-0f97-4eec-a211-cad28a6e5360"}To list the owner’s pets run:
$ curl -v http://127.0.0.1:8000/api/owner/{owner_id}/pets
for example:
$ curl http://127.0.0.1:8000/api/owner/a05fd0df-0f97-4eec-a211-cad28a6e5360/pets
expected output:
[{"address":"home","age":57,"name":"tlmodylu","owner_id":"a05fd0df-0f97-4eec-a211-cad28a6e5360","pet_id":"a52adc4e-7cf4-47ca-b561-3ceec9382917","weight":5}]To list each specific pet’s sensor:
$ curl -v curl -v http://127.0.0.1:8000/api/pet/{pet_id}/sensors
for example:
$ curl http://127.0.0.1:8000/api/pet/cef72f58-fc78-4cae-92ae-fb3c3eed35c4/sensors
produces this output:
[{"pet_id":"cef72f58-fc78-4cae-92ae-fb3c3eed35c4","sensor_id":"5a9da084-ea49-4ab1-b2f8-d3e3d9715e7d","type":"L"},{"pet_id":"cef72f58-fc78-4cae-92ae-fb3c3eed35c4","sensor_id":"5c70cd8a-d9a6-416f-afd6-c99f90578d99","type":"R"},{"pet_id":"cef72f58-fc78-4cae-92ae-fb3c3eed35c4","sensor_id":"fbefa67a-ceb1-4dcc-bbf1-c90d71176857","type":"L"}]To review the data from a specific sensor:
$ curl http://127.0.0.1:8000/api/sensor/{sensor_id}/values?from=2006-01-02T15:04:05Z07:00&to=2006-01-02T15:04:05Z07:00
for example:
$ curl http://127.0.0.1:8000/api/sensor/5a9da084-ea49-4ab1-b2f8-d3e3d9715e7d/values\?from\="2020-08-06T00:00:00Z"\&to\="2020-08-06T23:59:59Z"
produces this expected output:
[51.360596,26.737432,77.88015,...]Code Structure and Implementation
The code package structure is as follows:
| Name | Purpose |
| /api | swagger api spec |
| /cmd | applications executables |
| /cmd/migrate | install database schema |
| /cmd/sensor | simulates the pet’s collar |
| /cmd/server | web application backend |
| /config | database configuration |
| /db | database handlers (gocql/x) |
| /db/cql | database schema |
| /handler | swagger REST API handlers |
| /model | application models and ORM metadata |
After data is collected from the pets via the sensors on their collars, it is delivered to the central database for analysis and health status checking.
The collar code sits in the /cmd/sensor and uses scylladb/gocqlx Go driver to connect to the database directly and publish its data. The collar gathers sensor measurements, aggregates data in a buffer and sends it every hour.
Overall all applications in this repository use scylladb/gocqlx for:
- Relational Object Mapping (ORM)
- Building Queries
- Migrating database schemas
The web application’s REST API server resides in /cmd/server and uses go-swagger that supports OpenAPI 2.0 to expose its API. API handlers reside in /handler. Most of the queries are reads.
The application caches sensor measurements data on an hourly basis. It uses Lazy Evaluation to manage sensor_avg. It can be viewed as an application-level lazy-evaluated materialized view.
The algorithm is simple and resides in /handler/avg.go:
- read sensor_avg
- if aggregated data is missing, read measurement data, aggregate in memory, and save.
- serve the request
Additional Resources, Future Plans
You can find the project code in the Github repo. The guides are here.
We’re working on expanding this use case to include things like sizing, adding more languages and also adding more guides, stay tuned!
Additionally, these resources will help you get started with ScyllaDB:
- Scylla Essentials course on Scylla University. It provides an introduction to Scylla and explains the basics
- Data Modeling and Application Development course on Scylla University. It explains basic and advanced data modeling techniques, including information on workflow application, query analysis, denormalization, and other NoSQL data modeling topics.
- Scylla Documentation: getting started.
- Have questions? Join the Scylla users Slack channel